說明如何使用
XDocReport API 將 Word 套表轉換成 Word 或 PDF,看完首頁的說明及操作
線上Demo可大致了解 API 的功能,測試的過程中 Word -> Word 後套表格式及中文目前的測試都正常,但Word -> PDF 英文沒問題、格式有些不正確而中文無法顯示,修改 API 後中文可獲得部份解決,格式的部份沒有細究還是有問題,後續會再詳細說明。
Microsoft Office
| Document | Template | Converter |
| Docx | Freemarker | | docxandfreemarker-0.9.8-sample.zip |
| Docx | Velocity | | docxandvelocity-0.9.8-sample.zip |
| Docx | Velocity | PDF/XHTML | docxandvelocity.converters-0.9.8-sample.zip |
| PPTX | Velocity | | pptxandvelocity-0.9.8-sample.zip |
Open/Libre Office
| ODP | Velocity | | odpandvelocity-0.9.8-sample.zip |
| ODT | Velocity | | odtandvelocity-0.9.8-sample.zip |
| ODT | Velocity | PDF/XHTML | odtandvelocity.converters-0.9.8-sample.zip |
從上表可以看到不單單處理Word,套表還可接受PPTX、ODP、ODT的格式。
Handle各個格式的套件如下:
- Microsoft Word - Apache POI - HWPF
- XHTML - Apache POI - XWPF
- PDF - Lowagie iText
- Template Replace - Apache Velocity、FreeMarker
以上資料都可從
XDocReport官網中查詢取得。
準備執行環境
測試時會用到的環境
- JDK (Java Development Kit) version 1.6+
- Apache Maven 2.2.1+
- XDocReport 0.9.8
下載XDocReport Sample,需求是以MS Word為套表,轉成Word或PDF,因此下載下列二個zip file
docxandvelocity-0.9.8-sample.zip此Sample示範各種格式的 Word 轉 Word。docxandvelocity.converters-0.9.8-sample.zip則示範 Word 轉 PDF/XHTML。
Build & Running Docx Velocity Converters Sample
將上述取得的.zip解壓縮,解壓縮後的目錄結構如下圖,每個 Sample 所用到的 API 都放在 libs 路徑下,包含 XDocReport API。
因 docxandvelocity converters sample 的 library 包含 docxandvelocity sample
的 library ,所以將要測試的檔案放到
docxandvelocity converters sample 路徑下,並建立可執行 maven 的目錄結構
- 將
docxandvelocity-0.9.8-sample\docxandvelocity-0.9.8\src\fr\opensagres\xdocreport\samples\docxandvelocity 目錄下的 DocxProjectWithVelocity.java、DocxProjectWithVelocityList.java 二個 java file 複製到 docxandvelocity converters sample 的相對應路徑
- 於測試路徑下建立目錄
src\main\java 並將 docxandvelocity converters sample 的 src 複製到此路徑,建立完成則如下圖

- 於
docxandvelocity.converters-0.9.8 目錄下建立 pom.xml,line-43、49、55說明各個套件
<?xml version="1.0" encoding="UTF-8"?>
<project xmlns="http://maven.apache.org/POM/4.0.0" xmlns:xsi="http://www.w3.org/2001/XMLSchema-instance" xsi:schemaLocation="http://maven.apache.org/POM/4.0.0 http://maven.apache.org/xsd/maven-4.0.0.xsd">
   <modelVersion>4.0.0</modelVersion>
   <groupId>docxConverters</groupId>
   <artifactId>docxConverters</artifactId>
   <version>1.0-SNAPSHOT</version>
   <name>docxConverters</name>
   <url>http://maven.apache.org</url>
   <build>
      <plugins>
         <plugin>
            <groupId>org.apache.maven.plugins</groupId>
            <artifactId>maven-compiler-plugin</artifactId>
            <configuration>
               <source>1.6</source>
               <target>1.6</target>
               <encoding>UTF-8</encoding>
            </configuration>
         </plugin>
         <plugin>
            <groupId>org.apache.maven.plugins</groupId>
            <artifactId>maven-resources-plugin</artifactId>
            <configuration>
               <encoding>UTF-8</encoding>
            </configuration>
         </plugin>
         <!--            -->
         <plugin>
            <groupId>org.apache.maven.plugins</groupId>
            <artifactId>maven-surefire-plugin</artifactId>
            <configuration>
               <skipTests>true</skipTests>
            </configuration>
         </plugin>
      </plugins>
      <resources>
         <resource>
            <directory>src/main/resources</directory>
         </resource>
      </resources>
   </build>
   <dependencies>
      <!--     use MS Word docx       -->
      <dependency>
         <groupId>fr.opensagres.xdocreport</groupId>
         <artifactId>fr.opensagres.xdocreport.document.docx</artifactId>
         <version>0.9.8</version>
      </dependency>
      <!--     use Velocity       -->
      <dependency>
         <groupId>fr.opensagres.xdocreport</groupId>
         <artifactId>fr.opensagres.xdocreport.template.velocity</artifactId>
         <version>0.9.8</version>
      </dependency>
      <!--     convert docx 2 PDF/XHTML       -->
      <dependency>
         <groupId>fr.opensagres.xdocreport</groupId>
         <artifactId>fr.opensagres.xdocreport.converter.docx.xwpf</artifactId>
         <version>0.9.8</version>
      </dependency>
   </dependencies>
</project>
-
切換到
docxandvelocity.converters-0.9.8 路徑執行下列指令
mvn compile
- 將第 2 點圖示中的三個 docx file 複製到
target 的相對應路徑(class file 所在目錄,接下來修改 word file 都是指此目錄的檔案),切換到 docxandvelocity.converters-0.9.8 路徑執行下列指令
mvn exec:java -Dexec.mainClass=fr.opensagres.xdocreport.samples.docxandvelocity.DocxProjectWithVelocity
-
如 4、5 點都執行成功,可看到產出的檔案
DocxProjectWithVelocity_Out.docx,套印後的內容則如官網的說明,這裡不再贅述,如有興趣其他範例也都可執行,也看看輸出的檔案更清楚 API 的功能。
MS Word 檔設定變數及Word套印
這部份是修改範例增加要套印的變數,都是參照官網的資訊來完成,官網會有更完整的說明。
- Word File 設定變數,可參照官網 Docx Design Report
- 將游標停留在要套印的地方,按
Ctrl + F9
- 在二個大括號中間按滑鼠右鍵,再點選【編輯功能變數】
- 【功能變數名稱】點選【MergeField】、【欄位名稱】-> 輸入帶【$】的名稱 ,按【確定】
- 設定完成後如下:
- 修改
DocxProjectWithVelocity.java,以下只列出修改的部份,就只有新增 line-200~204 這5行,與剛剛修改的word檔比對可看出,設定的變數就是key,value則自行設定
    public static void main( String[] args )
    {
        try
        {
            // 1) Load Docx file by filling Velocity template engine and cache
            // it to the registry
            InputStream in = DocxProjectWithVelocity.class.getResourceAsStream( "DocxProjectWithVelocity.docx" );
            IXDocReport report = XDocReportRegistry.getRegistry().loadReport( in, TemplateEngineKind.Velocity );

            // 2) Create context Java model
            IContext context = report.createContext();
            Project project = new Project( "XDocReport" );
            context.put( "project", project );

            context.put("fieldName1", "FieldFirst");
            context.put("titleName2", "MergeTitleTwo");
            context.put("parameter1", "row1,value3");
            context.put("parameter2", "row2,value1");
            context.put("parameter3", "red,row2,value1");

            // 3) Generate report by merging Java model with the Docx
            OutputStream out = new FileOutputStream( new File( "DocxProjectWithVelocity_Out.docx" ) );
            report.process( context, out );
        }
        catch ( IOException e )
        {
            e.printStackTrace();
        }
        catch ( XDocReportException e )
        {
            e.printStackTrace();
        }
    }
以上一節的方式 compile & run,產出的檔案 DocxProjectWithVelocity_Out.docx 畫面如下,變數都已被置換,接下來可以測中文的部份,不過中文目前測的結果沒有問題,因此不再說明有興趣的可以在來源word輸入中文,套印的變數值也可以輸入中文二種方式都試試看:
MS Word 檔設定變數及PDF套印
Word檔直接採用上一節的因此不用再設定變數,sample 則改用
DocxProjectWithVelocity2PDF.java,
compile & run也是參照前面的做法。
- 修改
DocxProjectWithVelocity2PDF.java,將上一節的 line-200~204 這5行直接copy過來, 對應過來則是 line-202~206 這5行 ,接著compile跟執行。
 public static void main(String[] args) {
  try {
   // 1) Load Docx file by filling Velocity template engine and cache
   // it to the registry
   InputStream in = DocxProjectWithVelocity2PDF.class
     .getResourceAsStream("DocxProjectWithVelocity.docx");
   IXDocReport report = XDocReportRegistry.getRegistry().loadReport(
     in, TemplateEngineKind.Velocity);

   // 2) Create context Java model
   IContext context = report.createContext();
   Project project = new Project("XDocReport");
   context.put("project", project);

   context.put("fieldName1", "FieldFirst");
   context.put("titleName2", "MergeTitleTwo");
   context.put("parameter1", "row1,value3");
   context.put("parameter2", "row2,value1");
   context.put("parameter3", "red,row3,value2");

   // 3) Generate report by merging Java model with the Docx
   OutputStream out = new FileOutputStream(new File(
     "DocxProjectWithVelocity_Out.pdf"));
   // report.process(context, out);
   Options options = Options.getTo(ConverterTypeTo.PDF).via(
     ConverterTypeVia.ITEXT);
   report.convert(context, options, out);

  } catch (IOException e) {
   e.printStackTrace();
  } catch (XDocReportException e) {
   e.printStackTrace();
  }
 }
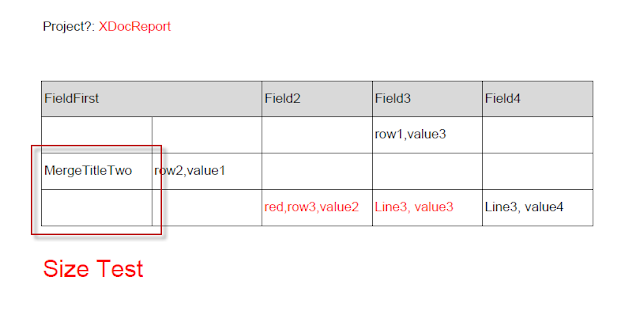
產出的檔案 DocxProjectWithVelocity_Out.pdf 畫面如下,變數都已被置換,但直式的合併儲存格(MergeTitleTwo)不如預期無法正確呈現:
修改 DocxProjectWithVelocity2PDF.java,將 line-206 改為如下的中文輸出,接著compile跟執行,查看DocxProjectWithVelocity_Out.pdf可看出中文都無法正常顯示。
   context.put("fieldName1", "FieldFirst");
   context.put("titleName2", "MergeTitleTwo");
   context.put("parameter1", "row1,value3");
   context.put("parameter2", "row2,value1");
   context.put("parameter3", "紅色第三行第二格");
相關問題說明
Word to PDF如文章一開頭的說明會有格式的問題,測試到目前為止只發現直式存儲格的問題,但不確保沒有其他問題,如後續有其他發現會再補上。
至於中文問題,會在下一篇再做詳細說明,基本方向是即然是用iText處理PDF,而iText是支援中文的,這部份應該可以獲得解決。
相關設定可參考:
XDocReport API


沒有留言:
張貼留言